Pages

Thursday, October 23, 2014

Fall recipes #fallingforfall

Hello lovelies!
How are you all doing? Can you believe it's been a FULL SEASON since we've posted something. My sincerest apologies for that... I had some writers block and wasn't sure what to post. Oh and I also had school. Yah, that... 😐
I hope you enjoy this fall recepies post! Fall is one of my favorite seasons... 
Also we're starting a new series. Called #fallingforfall... There will be six posts that have to do with fall so get excited! Love ya'll.
In the mornings I enjoy a filling, healthy breakfast. I love to spice things up a bit though, and put some fall into my mornings! One of my favorite fall recipes is my Pumpkin Spice Oats. They're warm and delicious and fall up any morning! Enjoy 
And as they say in French Bon Appetit! 😉

Here is my favorite fall breakfast recipie...

With a warm bowl of pumpkin oats, I like to have a healthier alternative to Starbucks. (Even though I still am secretly in love with it...) this Pumpkin Pie hot chocolate is the best healthy hot chocolate recepie for fall! 

*sorry I spelled cocoa wrong in the directions... Forgive me ;)*

So once my mornings are filled with fall and my tummy is full, I move on with my day. I shower, get ready, and do soemthing productive... Or just sit on my couch and catch up on The Voice. (TBH...)
:) ;) wink wink 

So after I've done something with my day I eat lunch or have a snack. My go to snack is my Fantastic Fall snack mix! Sounds complicated, but is actually super easy... And yummy! 👍

Here's the wonderful recipe!


Sounds delicious right?! 

Well let me confirm, it is!
Another option to make it a bit more fall-y is to add pumpkin seeds. 
Just a tip :) ^

Alright so here are a few more snack and drink recipies for fall! 
Enjoy!! 


This recipie is a wonderful drink to make. It looks so fancy and sophisticated! Also, it's super fun to serve these at a dinner! They look so pretty and fall-y... 


Now, this is a perfect desert to finish your fall day with! I love these, as you can see I LOVE pumpkin! 
I have a secret love, well now it's not so secret... 

Now I'm going to make these recepies and go watch gossip girl... Which I just discovered, and let me tell you. ITS AMAZING! I also have a secret love for that show... 😶

Talk to you later loves,
XOXO-
Kate 


Sunday, August 24, 2014

Peanut butter dark chocolate coconut caramel saltine granola bars...

Hello lovelies!!

This is now my second time writing this post, my first one got deleted. 😔 
Anyways back on track now!! 

If you did not read the title of this post go back and read it now!! (I'm waiting...)
5
4
3
2
1
...

Alright, does that title not sound DIVINE?! Like super delicious, mouth watering, award winning wonderful yummy delicious divine? Well, I am here to say that I have made those!! These are super yummy!! And **SPOILER ALERT** these are healthy!! Yay!! Well, these aren't like super kale, salad etc... Healthy but they are healthier then the store bought granola bars!! Yay!! 
So I was searching through Pinterest, cookbooks, and online and finally found a recepie. I found it on Pinterest. How this recepie that I found was for peanut butter granola bars, but I decided to put a kate- style spin on them. I added dark chocolate chips, shredded coconut, caramel, and saltines. 
So after diving into my pantry (not literally 😊) I found all if these ingredients and decided to add them in. What I did was bake then granola bars and the a deed all of those ingridients. 

So the first thing I did was melt some peanut butter in the microwave.


After the peanut butter melted I drizzled it on top, and then plopped on some chocolate chips, then sprinkled on some shredded coconut, and for a grand finale I drizzled on some caramel sauce. 
It looks show stopping, and tastes like a famous cookie recepie, but they're not cookies they're GRANOLA BARS!! So you can eat them whenever and wherever. These granola bars are my go to snack, and they're SUPER easy to transport. 

So here comes the magic moment, drumroll please. Now, the picture of the granola bars fresh out of the oven. 

  <--- these are fresh out of the oven and still hot. This is the best time to cut them. 😀

So here comes the food fashions show!!

  BAM!!

 la la!! 

 Oh my!! Were getting up close and personal now!!


These are soo good, I totally reccomend you to try them!!


so here's my name for them: Magic granola bars


MAGIC GRANOLA BAR RECIPIE---


I mix in in what I call "add ins"... Example- chocolate chips, coconut, nuts, dried fruit, and even saltines. 😊☺️ 

Now the other directions are to bake them for 22 mins in oven at 350 degrees. 

Then I put them in the fridge to harden, they are super yummy and easy to make. 
 

Alright thanks girly girls for reading this!! I hope you try this recepie out, and if you do leave a comment below!! 

Lots of love,
Kate 

Friday, August 8, 2014

Kate's playlist...

Hello lovelies!!!

I just had a lightbulb moment!! I finally figured out how to post pics to blogger, so I figured I would post a post with pictures! And I decided to post something I've wanted to do for a while... My playlists!! It is going to be a three part series of my favorite playlists and songs. I use spotifiy a lot so that's where most of my playlists are made. So today I will be showing you pics of my favorite songs and playlists! I am currently jamming out to them so let's hop right in!!


PLAYLIST #1-- "Happy Happy" playlist. This is my playlist that I love to jam out to when getting ready or doing things. Sometimes it's just dancing... :). It's a mix of jaminn' oldies, and fun pop songs.


Song one- Happy together by The Turtles 
This song is a fun happy oldie that puts you in a super great mood. Yes, even on a Monday morning!!

Song two- Here comes the Sun by The Beatles
This song makes me so happy. I mean who doesn't love a song where the sun is shining and everybody is loving?? 

Song three- Wake me up before you go-go by Wham! 
This is one of my favorite songs in this playlist... It is an oldie but it's super fun to sing along too. "Wake me up before you go- go don't wanna..." (Those are some of the lyrics ) 

Song four- Back home by Andy Grammer 
This song has a super fun beat... It is a great dancing song!! I really get into it sometimes :)

I accidentally skipped Shower and Headphones so those are # 8&9...

Song five- Growing Old On Bleeker Street by AJR
This song is super sweet and just makes you so happy. When you listen to thus you just feel like your on top of the world. Or at least I do....

Song six- Walkin' on sunshine by Katrina and the waves
This is an 80's song but everyone knows about it. I love this song it is also one of my favs in this playlist. I mean who wouldn't want to feel like their walking on sunshine?! It just puts everyone in a great happy mood. 

Song seven- The lazy song by Bruno Mars
I'm pretty sure that everyone, well almost everyone..., knows about this song. "Have some really nice... BREAKFAST" Lol, am I the only one who shouts that when that line comes on? This song just makes you feel happy even though you have to get out of bed. I mean, unless your having a lazy day? ;)

Song eight- Shower by Becky G.
I don't know about you but I JAM (emphasis on JAM) out in my room. I dance all around and sing at the top of my lungs... :). This is the perfect song to do that to. It has a fun beat and is a pop song. 

Song nine- Headohones by Matt Nathanson
This song is just great, it is a newer song and it's very fun to dance to. If you learn the lyrics it's also fun to sing to.


I hope you guys enjoyed my happy happy playlist. It puts me in a great mood even on Monday morning when I have to get up early. Everyone should find something or do something that makes them happy. For me, that's blogging and listening to music. :). Two things I'm doing now.  

Love ya,
Kate <3 

Quote of the post-- "Happiness is a perfume you can not always pour on others without getting a few drops on yourself." -Ralph Waldo Emerson-


Saturday, July 26, 2014

Chic in minutes... PART TWO

Hello again...
My part one post was very very long, so long I started to run out of room on the page. Unfortunately I didn't realize that, and all of my fashion and hair tips did not save. So part two is how going to be hair tips and fashion tips.


TIP ONE:
Pick out your outfits the night before. This sounds super simple, but trust me it makes a big difference. When you have your outfit picked out already it's one less thing you have to worry about in the morning. This will save you time and effort.

TIP TWO:
Make a "fashion guidebook". A fashion guidebook is pictures of nice looking outfits. During the summer or the weekends lay out some outfits that look good p, and take pictures of them. That way of your at a loss for what to wear, you can just open your notebook and find an outfit. You can organize your fashion guidebook in seasons and appropriateness. EX- Fall, Spring, Buisness, Casual... I keep a fashion guidebook myself. :)

TIP THREE:
DO NOT style your hair!! It will take wayy to long... If you have to Blowdry your hair, just Blowdry it 50% of the way and then swirl it up into a top knot. This step saves LOTS of time. Trust me, if you think about how long does it take to flat iron or curl your hair??

TIP FOUR:
Put your hair up!! Everyone can rock a ponytail... But if you don't feel like wearing a classic pony, rock these hairstyles.
Hairstyles-
Top knot
Side braid
Sock bun
French braid
Any of these hairstyles are super chic, simple, and cute. They will save you time and you will look put together,


~Thank you so much for reading this girlys. It took me a long time to write. And I FINALLY found how to upload pictures... Hooray!! If you have a post you would like us to do, feel free to email us at wishableblog@gmail.com. We love doing this, and hopefully y'all like reading these posts. Please like. Comment, and follow. We will love you forever!! Thanks soo much, and have a fabulous day.~


Love and smiles,
Kate :)

Chic in minutes

It's Monday morning and you flounce out of bed at 7:00 in the morning. The birds are chirping, the sun is out and you are in a great mood. You go downstairs and have a healthy omelet with a bowl of fresh, organic fruit. Then you go back upstairs to the bathroom, and apply your makeup. Once you've achieved a flawless face you twirl over to the closet. You pick out a boho-chic outfit that represents your mood and personality perfectly. Then you brush your teeth pack your bag, grab a pair of suede booties and your out the door. You get to wherever you need to be fifteen minutes early, so you grab a healthy green juice. As you slowly sip it, enjoying all of your free time you realize this is going to be a fantastic day...

BRINGGGG BRINNGGGG!!! (That's the sound of your alarm clock...). Let's get back to reality here... It's Monday morning you woke up late, it's raining and you have an important meeting to get to in, oh about forty- five minutes. You rush down stairs eat a quick bowl of cereal, and then sprint right back upstairs to the bathroom. You sit down and apply whatever makeup you can find. You go to your closet grab the nearest dress and zip into it. Then you speed away to your meeting arriving five minutes late. Not exactly the way you want to start your day...

So if your like me, Monday morning or any morning can turn really off (for lack of a better word) if you wake up late. Generally, when I wake up late I feel off and rushed during the whole day...
But waking up late happens sometimes... Mainly when I press the snooze button a few to many times.
I'm sure lots of us can relate to this... :) So, I have decided to share my tips to look chic and flawless in minutes with you. This way you won't be late to work or school by spending to much time getting ready. So let's "twirl" into this. :)

When I wake up late the first thing I do is eat a healthy and filling, key word healthy, breakfast.
Breakfast is like gas for a car. If you eat a good, healthy, filling breakfast you will have a full tank
of "gas" for the day. In this case gas is energy. Here are some of my favorite breakfasts. I like to make my breakfast according to the season.

My fast, fueling, seasonal, healthy(ish) breakfast options:

~ INSTANT OATMEAL
I love this breakfast in the winter or fall, it really fills me up and gives me great protein and fiber.
I just make plain instant oatmeal by Quaker, and then put some brown sugar and blueberries on top.
This meal takes about ten minutes to make.


~ SMOOTHIES
I drink smoothies in the spring and summer
Smoothies are a GREAT way to get in a serving of fruit without all of the hassle of chopping, and
dicing. All I do is get frozen strawberries, peaches, and mangos then I throw those in a blender with some orange juice and milk. Put it in a to go cup and your ready.

So now that we have breakfast covered lets get into makeup. We all want a super easy makeup routine that's fast so here are my tips on how to do that...
So every good makeup routine starts by washing your face. So wash your face with a simple cleanser or scrub that works for your skin type. Now, for an easy, fast makeup look you just need a couple of things. Grab your favorite concealer, mascara, and powder. Apply those products with your favorite brushes. Then when you are finished with that simple step grab something I like to call a "statement
product". A statement product means basically what it says. It's a product that will make a statement. 
These specials products include black eyeliner, red lipstick, and bold eyeshadow. Basically you want 
to choose a product that will stand out. Then your super simple face makeup won't look as simple, 

and everyone will be staring at your gorgeous statement product. This could be a black winged liner 
to accentuate your eyes, or a bold eye look, or just some classic red lips. This a super fast technique that will make you look very put together, and unique. 

Here are some great statement products:


This is a great non smudging black felt tip eyeliner. 


This is a great red lipstick for fair skin tones. It really pops of your lips.


Tuesday, June 17, 2014

Tip Tuesday/Thursday 2

Hey everyone! We're posting another Tip Tuesday/Thursday today!  So today's theme is nails, so here are my three favorite nail hacks/tips and their links:

1)Thinking about purchasing a matte topcoat? Don't bother! You can do it yourself with something you probably already have. To turn glossy nails matte, you can take a clear topcoat and mix it with a pinch of cornstarch. Then when you paint the topcoat over your nail polish, it creates matte nails.

I also liked the look of these matte grey nails, looks very chic!


Credit for this idea:
http://dropdeadgorgeousdaily.com/2013/04/ddg-diy-how-to-make-your-own-matte-nail-polish/


2) You can also use another common household item to make nail designs: tape. To do so, paint the tape your desired color and when it dries, cut out your design. I prefer to just do stripes because they are the easiest haha. Then stick the tape design on your nails and finish with a topcoat.

This was a picture tutorial for tape nails stickers done by the beauty department.


Credit for this idea:
http://thebeautydepartment.com/2012/04/sticky-situation/


3) Lastly, if you're like me and you spill a lot, this will turn out to be quite helpful. If you drop a bottle of nail polish and spill it, pouring sugar over it makes the nail polish clump so you can sweep it up.


This was the picture I found on Pinterest (A link to our interest account if you want to follow :) http://www.pinterest.com/wishable/ )
that described this tip. Unfortunately, like many pins on Pinterest it led to a dead link and I could not find credit for this tip but here is the link to the pin: http://www.pinterest.com/pin/451908143832284687/


I also really like this picture because it combines our tips (assuming someone spilled nail polish in the process) and it's a really cute idea! Let us know if you try it!


Thanks so much for reading and I hope you learned something new, or were inspired to do a new style of nails. (Doing my nails right after this) We'll post another one of these on Thursday so stay tuned!
We love you!

Kate & Sarah

Thursday, June 5, 2014

Tip Thursday/ Tuesday

Hello!!

It's Thursday! I am sure you knew that, but I just had a splendid idea for a new blog series!! So, I love finding new beauty&fashion tips and hacks. I was thinking for this new series we should call it Tip Tuesday or Tip Thursday depending on what day it is. So, today it's Thursday and the post will be called Tip Thursday. This whole Tip Tuesday or Thursday series is about Sarah or me posting 3-5 beauty or fashion hacks/tips every Tuesday or Thursday. Sounds fun right?! Let's hope because here goes...


{Beauty hacks/tips}

Tip 1- You can use Vaseline for SO many things!!
You can use it as a(n) eye makeup remover, lip balm, lip scrub base, cuticle lotion, and even as an eyelash conditioner. (It makes your eyelashes really thick.)

Tip 2- When you paint your nails you can stick your wet nails into a bowl of really cold ice water for 2-3 minutes and they will dry.

Tip 3- To make a lacquered lipstick matte put a tissue over your lips, and brush over it with a translucent powder. If you want a 3D effect on your lips brush a bit of shimmery eyeshadow (a shade that almost matches your lipstick) in the center of your lower lip.


Thanks girls! Hope you enjoyed and learned something new...

Kate & Sarah

Tuesday, June 3, 2014

All alone?

Hello...

Today I come to you with a touchy subject. Now, it's not anything bad, but I just want to address the situation. So let's hop into the post...

Sarah and I love posting, it brings us happiness. As you can see there has not been any posts since April, our only excuse for that is SCHOOL. The last few weeks have been hectic because of exams. Sarah and I have been studying and studying, but now exams are over and school is out!! No more radio silence on the internet world!!

Now as you can see by the title which says All alone, the first part of this post has nothing to do with it. That first paragraph is just an explanation of why we haven't posted in a long time. But, the entire reason of why I'm posting this (btw... This is Kate writing the post) is because we have no followers. Now before I look like a total poop head I want to say I am content right now posting things and having no followers. But, I feel as if there are so many people put there who should see Sarah and I's posts. We work very hard to post things that are creative and like able. Sarah and I have hopes of becoming important and known bloggers. This is the whole reason I am posting this, if you lovely people who look at our blog could spread the word about Wishable blog that would be fantastic. If you need some motivation to do this, I am sure Sarah and I will host a giveaway if we gain followers. But, I am talking a giveaway when we have 100 subscribers or more. So even though Wishable blog has nobody subscribed to them, exactly what I am talking about we are all alone, I am sure we can gain followers!! With our lovely viewers who will hopefully help us!!, Sarah and I's goal is to have 25 subscribers by the end of August! So please help is out, and instead of "wishing" about subscribers we can make our dreams come true and actually have them.

THANK YOU GUYS SO MUCH!!!

Kate & Sarah

Sunday, April 20, 2014

DIY Easter cupcakes and centerpiece

Hey guys! Sorry for lack of posts we've been super busy! But for now, let's get into the post!
So Easter is this Sunday and I thought I would make a cute but easy dessert, and something to spice up the table and add a little color. So first I'll show you how to make some really cute and simple Easter cupcakes!

Easter cupcakes:


Supplies:


- a batch of cupcakes (not shown), I made mine from a box because it's easier but any other kind of homemade cupcakes are great too!
- frosting or icing(not shown)
-shredded coconut
- green food dye
- Cadbury mini eggs
-a plastic bag or two with a seal

1) First we're going to color the coconut to look like grass. You want to put some coconut in a plastic bag (what size cupcakes you make depends on how much coconut you need) and put one or two drops of green food coloring in the bag with the coconut. Now seal the bag (make sure you are absolutely positive it won't open!!!) and start shaking and moving the coconut around with the dye so it gets to all of the coconut. You can add more food coloring if you want your grass to be greener. When all the coconut has been colored you can move on to the decorating.

 2) Ok so after you've baked yourself some cupcakes and let them cool all the way, you want to start decorating. I decorated mine one at a time so the frosting would harden after I put it together. So start with your first cupcake and spread a layer of frosting on it, not too much but enough to hold the coconut. Then, sprinkle some coconut on the frosting and maybe push it down a little to make sure it sticks.

3) Then, you want to take your Cadbury mini
eggs and put a little bit of frosting on the bottom of two or three of them and stick them on top of the coconut. And voila! You've made some very cute Easter cupcakes!


Now I'll show you how to make an equally simple Easter centerpiece, you can make this as big or small as you want.

Supplies:
- Two vases, one bigger and one smaller. Make sure the smaller one fits nicely inside the bigger one and has a little room between the two because you are going to fill this space. I also find that it works best if the larger vase is a cylinder.
- Peeps! I used the yellow bunny ones from target. They came in a pack of four, and I bought two packs. Just make sure you have enough to fit around the vase.
- Any kind of colorful shredded paper to stuff around the peeps, I got this also at Target in the party bags and decorations section.
- flowers to put in your smaller vase

Really all you need to do is first put the smaller vase inside the larger one. Then, stuff the bottom of the space between the vases with some of the colored paper. Place the peeps in between the vases on top of the paper, and lastly put some more colored paper on top. Fill with flowers and you're done!!!


I hope you enjoyed these super easy Easter DIYs!!! Let us know if you enjoyed this type of post and if you want more, or if you made these yourself! Email us at wishableblog@gmail.com
Until next time, happy Easter!!!!

Sarah & Kate

Friday, March 21, 2014

DIY Tassel Necklace

Recently I've noticed that tassel necklaces are becoming more and more popular. I thought they were a really fun piece to add to my wardrobe, however the price tag made me think otherwise. I first spotted them at Anthropologie where they were being sold for over $100! So I decided that instead of buying it, I would make it myself! I ended up making it for much cheaper than what they were sold for and discovered that they also weren't too hard to make. So don't buy, DIY!

These were some of the necklaces I was also inspired by online:


Supplies:
- Your choice of beads, I used two different kinds from Michaels and ended up getting four strands of blue beads, each strand was seven inches. The other strand was used for little accent beads so I only needed one strand for that. Feel free to mix up different kinds of beads or stones, it's your necklace, so make it just the way you want it!
- Bead elastic or fishing line *NOTE: I used stretchy bead elastic at first, but my beads appeared to be too heavy and weighed it down. If you want to use smaller beads stretchy elastic is fine, but if yours are a little larger or heavier I would recommend something that doesn't stretch and isn't elastic, such as thin fishing line.
- Strong glue or super glue
- Scissors
- *OPTIONAL: If you decide you want to make your own tassel the way I did, you can use cotton embroidery thread. However if you have already have a tassel you want to use, that is fine too!
I actually got all my supplies from Michaels, but you can get any of them from your local craft store.
- Also if you are making a tassel you will need a piece of cardboard the size you want your tassel to be. It has to be strong enough to wrap thread around without folding.
First I'll show you how to make the tassel. Obviously if you already have a tassel you want to use, you can skip this part and move on to making the actual necklace. So first what you need is the embroidery thread *I have both colors pictured here but you only need one. You also need cardboard, scissors, and glue.
To make the tassel, start wrapping your embroidery thread around the cardboard.

Continue wrapping thread around the cardboard until it is as thick as you want your tassel to be. Remember you're going to remove the cardboard, and the tassel will be the thickness of both sides combined.
Now remove the cardboard like I mentioned before. Make sure to keep it in the shape of a loop as seen in the next two pictures below.


Now cut another piece of thread. I decided to fold it in half so it was a little thicker. Put the thread through the loop you've previously made as seen below.
Now take the two ends of the thread and tie a double knot above the loop. Then secure with glue. Don't cut the ends just yet, leave them for now.
Now take one more piece of thread and tie a knot around the thread about half an inch from the top.
Then, continue wrapping the piece around the thread and tie it off in the back. This is shown in the two pictures below.


Now cut the remaining ends off and secure with glue, you're almost done with the tassel!
Lastly take your scissors and put them through the bottom of the loop.This may be hard, but cut through the bottom of the loop, making your tassel!
You're now done with the tassel and you can get started on the necklace!
To start making your necklace, take either your bead elastic or thin fishing line and measure out how long you want it. Leave a little bit on the end so you'll be able to tie it. Then, take the thread that is still on the tassel and tie it around the string to attach your tassel. Trim the ends and secure with glue.
Now that the tassel is on your string, grab your beads!
I like to separate my beads into bowls when I have different types, so that is what I've done below.
I wanted use a few accent beads, so I took one bead and put both sides of the string through it. If you can sort of see what I've done below, instead of putting the bead on one string I've put it on both.
Here it is again a bit more zoomed out.
Now all you have to do is start stringing your beads!
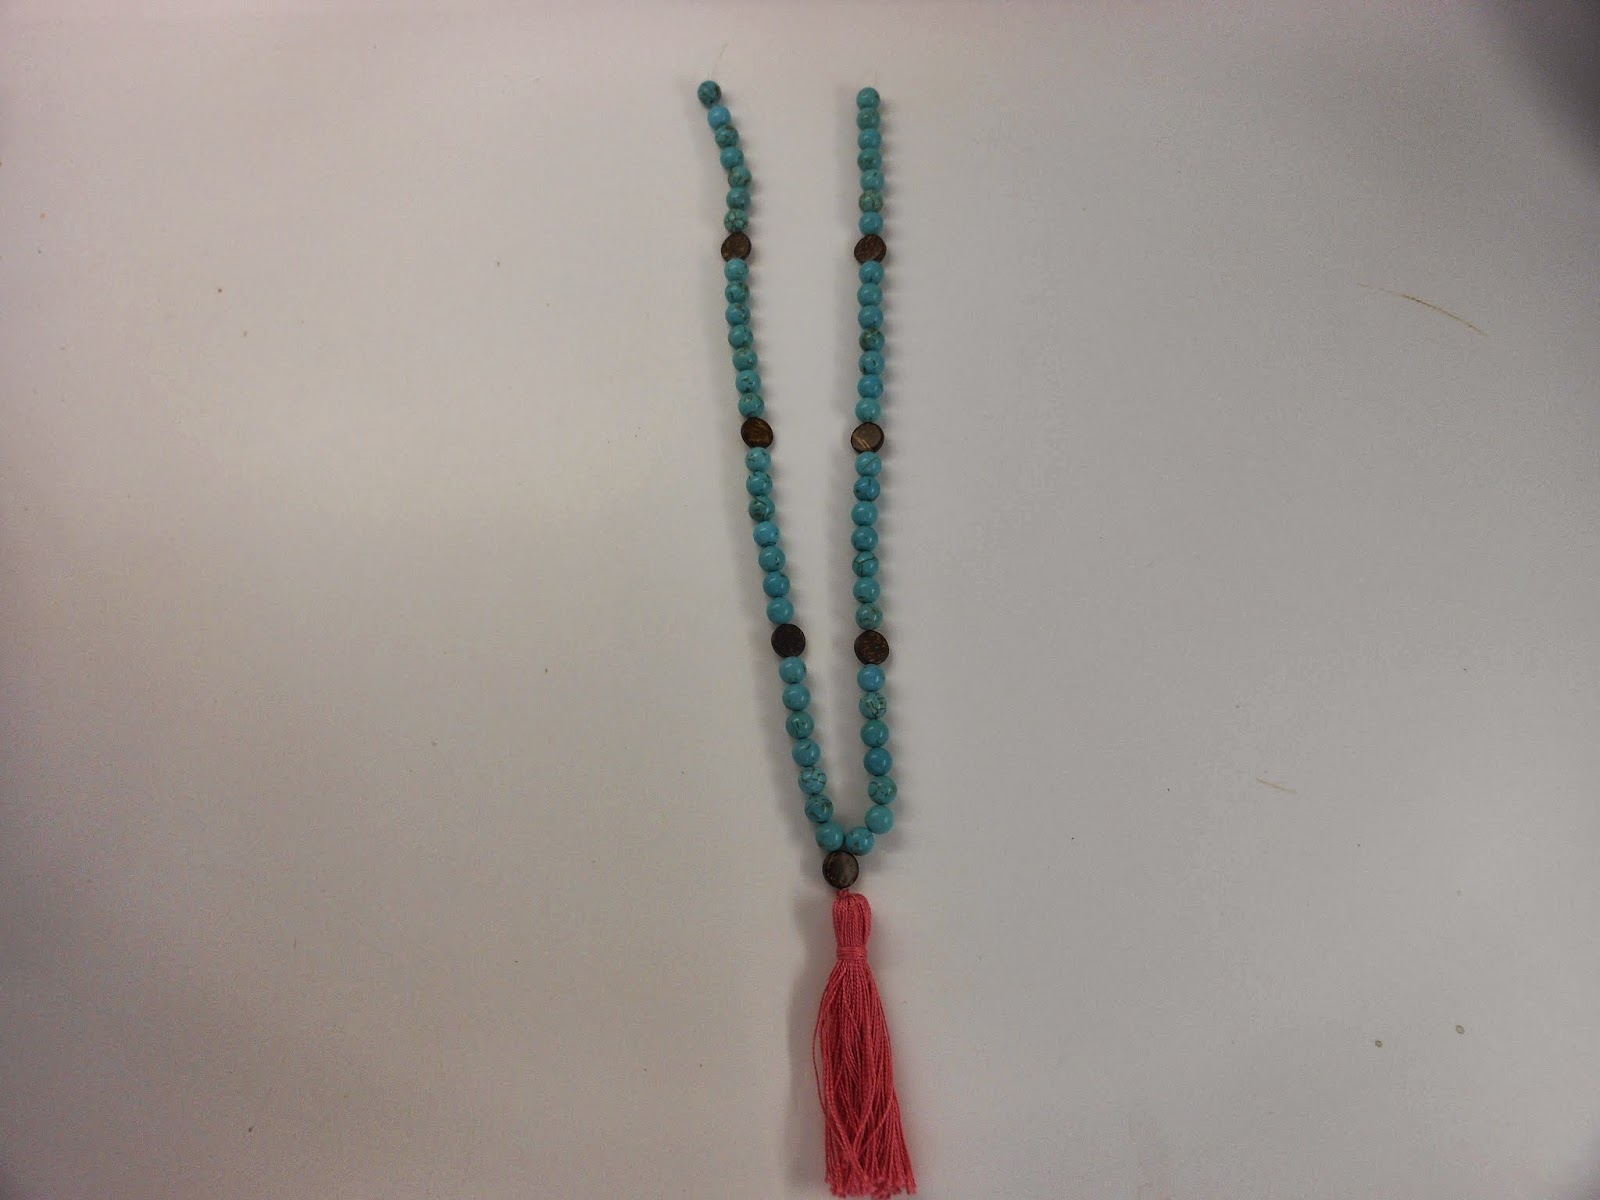
Continue stringing your beads on in any pattern you like! I've decided to do 7 blue beads, then one brown bead to break up the blue beads.
Make sure you have the right amount of beads you would like and that it is just how you want before you tie it off.
Now tie the two ends together and secure with glue! You're done!

You've now made your very own tassel necklace! This can be worn as a fun statement necklace, or if done with smaller beads, an accent piece. I hope you all enjoyed this post and let us know if you make your own! 


Kate & Sarah