Pages

Tuesday, June 17, 2014

Tip Tuesday/Thursday 2

Hey everyone! We're posting another Tip Tuesday/Thursday today!  So today's theme is nails, so here are my three favorite nail hacks/tips and their links:

1)Thinking about purchasing a matte topcoat? Don't bother! You can do it yourself with something you probably already have. To turn glossy nails matte, you can take a clear topcoat and mix it with a pinch of cornstarch. Then when you paint the topcoat over your nail polish, it creates matte nails.

I also liked the look of these matte grey nails, looks very chic!


Credit for this idea:
http://dropdeadgorgeousdaily.com/2013/04/ddg-diy-how-to-make-your-own-matte-nail-polish/


2) You can also use another common household item to make nail designs: tape. To do so, paint the tape your desired color and when it dries, cut out your design. I prefer to just do stripes because they are the easiest haha. Then stick the tape design on your nails and finish with a topcoat.

This was a picture tutorial for tape nails stickers done by the beauty department.


Credit for this idea:
http://thebeautydepartment.com/2012/04/sticky-situation/


3) Lastly, if you're like me and you spill a lot, this will turn out to be quite helpful. If you drop a bottle of nail polish and spill it, pouring sugar over it makes the nail polish clump so you can sweep it up.


This was the picture I found on Pinterest (A link to our interest account if you want to follow :) http://www.pinterest.com/wishable/ )
that described this tip. Unfortunately, like many pins on Pinterest it led to a dead link and I could not find credit for this tip but here is the link to the pin: http://www.pinterest.com/pin/451908143832284687/


I also really like this picture because it combines our tips (assuming someone spilled nail polish in the process) and it's a really cute idea! Let us know if you try it!


Thanks so much for reading and I hope you learned something new, or were inspired to do a new style of nails. (Doing my nails right after this) We'll post another one of these on Thursday so stay tuned!
We love you!

Kate & Sarah

Thursday, June 5, 2014

Tip Thursday/ Tuesday

Hello!!

It's Thursday! I am sure you knew that, but I just had a splendid idea for a new blog series!! So, I love finding new beauty&fashion tips and hacks. I was thinking for this new series we should call it Tip Tuesday or Tip Thursday depending on what day it is. So, today it's Thursday and the post will be called Tip Thursday. This whole Tip Tuesday or Thursday series is about Sarah or me posting 3-5 beauty or fashion hacks/tips every Tuesday or Thursday. Sounds fun right?! Let's hope because here goes...


{Beauty hacks/tips}

Tip 1- You can use Vaseline for SO many things!!
You can use it as a(n) eye makeup remover, lip balm, lip scrub base, cuticle lotion, and even as an eyelash conditioner. (It makes your eyelashes really thick.)

Tip 2- When you paint your nails you can stick your wet nails into a bowl of really cold ice water for 2-3 minutes and they will dry.

Tip 3- To make a lacquered lipstick matte put a tissue over your lips, and brush over it with a translucent powder. If you want a 3D effect on your lips brush a bit of shimmery eyeshadow (a shade that almost matches your lipstick) in the center of your lower lip.


Thanks girls! Hope you enjoyed and learned something new...

Kate & Sarah

Tuesday, June 3, 2014

All alone?

Hello...

Today I come to you with a touchy subject. Now, it's not anything bad, but I just want to address the situation. So let's hop into the post...

Sarah and I love posting, it brings us happiness. As you can see there has not been any posts since April, our only excuse for that is SCHOOL. The last few weeks have been hectic because of exams. Sarah and I have been studying and studying, but now exams are over and school is out!! No more radio silence on the internet world!!

Now as you can see by the title which says All alone, the first part of this post has nothing to do with it. That first paragraph is just an explanation of why we haven't posted in a long time. But, the entire reason of why I'm posting this (btw... This is Kate writing the post) is because we have no followers. Now before I look like a total poop head I want to say I am content right now posting things and having no followers. But, I feel as if there are so many people put there who should see Sarah and I's posts. We work very hard to post things that are creative and like able. Sarah and I have hopes of becoming important and known bloggers. This is the whole reason I am posting this, if you lovely people who look at our blog could spread the word about Wishable blog that would be fantastic. If you need some motivation to do this, I am sure Sarah and I will host a giveaway if we gain followers. But, I am talking a giveaway when we have 100 subscribers or more. So even though Wishable blog has nobody subscribed to them, exactly what I am talking about we are all alone, I am sure we can gain followers!! With our lovely viewers who will hopefully help us!!, Sarah and I's goal is to have 25 subscribers by the end of August! So please help is out, and instead of "wishing" about subscribers we can make our dreams come true and actually have them.

THANK YOU GUYS SO MUCH!!!

Kate & Sarah

Sunday, April 20, 2014

DIY Easter cupcakes and centerpiece

Hey guys! Sorry for lack of posts we've been super busy! But for now, let's get into the post!
So Easter is this Sunday and I thought I would make a cute but easy dessert, and something to spice up the table and add a little color. So first I'll show you how to make some really cute and simple Easter cupcakes!

Easter cupcakes:


Supplies:


- a batch of cupcakes (not shown), I made mine from a box because it's easier but any other kind of homemade cupcakes are great too!
- frosting or icing(not shown)
-shredded coconut
- green food dye
- Cadbury mini eggs
-a plastic bag or two with a seal

1) First we're going to color the coconut to look like grass. You want to put some coconut in a plastic bag (what size cupcakes you make depends on how much coconut you need) and put one or two drops of green food coloring in the bag with the coconut. Now seal the bag (make sure you are absolutely positive it won't open!!!) and start shaking and moving the coconut around with the dye so it gets to all of the coconut. You can add more food coloring if you want your grass to be greener. When all the coconut has been colored you can move on to the decorating.

 2) Ok so after you've baked yourself some cupcakes and let them cool all the way, you want to start decorating. I decorated mine one at a time so the frosting would harden after I put it together. So start with your first cupcake and spread a layer of frosting on it, not too much but enough to hold the coconut. Then, sprinkle some coconut on the frosting and maybe push it down a little to make sure it sticks.

3) Then, you want to take your Cadbury mini
eggs and put a little bit of frosting on the bottom of two or three of them and stick them on top of the coconut. And voila! You've made some very cute Easter cupcakes!


Now I'll show you how to make an equally simple Easter centerpiece, you can make this as big or small as you want.

Supplies:
- Two vases, one bigger and one smaller. Make sure the smaller one fits nicely inside the bigger one and has a little room between the two because you are going to fill this space. I also find that it works best if the larger vase is a cylinder.
- Peeps! I used the yellow bunny ones from target. They came in a pack of four, and I bought two packs. Just make sure you have enough to fit around the vase.
- Any kind of colorful shredded paper to stuff around the peeps, I got this also at Target in the party bags and decorations section.
- flowers to put in your smaller vase

Really all you need to do is first put the smaller vase inside the larger one. Then, stuff the bottom of the space between the vases with some of the colored paper. Place the peeps in between the vases on top of the paper, and lastly put some more colored paper on top. Fill with flowers and you're done!!!


I hope you enjoyed these super easy Easter DIYs!!! Let us know if you enjoyed this type of post and if you want more, or if you made these yourself! Email us at wishableblog@gmail.com
Until next time, happy Easter!!!!

Sarah & Kate

Friday, March 21, 2014

DIY Tassel Necklace

Recently I've noticed that tassel necklaces are becoming more and more popular. I thought they were a really fun piece to add to my wardrobe, however the price tag made me think otherwise. I first spotted them at Anthropologie where they were being sold for over $100! So I decided that instead of buying it, I would make it myself! I ended up making it for much cheaper than what they were sold for and discovered that they also weren't too hard to make. So don't buy, DIY!

These were some of the necklaces I was also inspired by online:


Supplies:
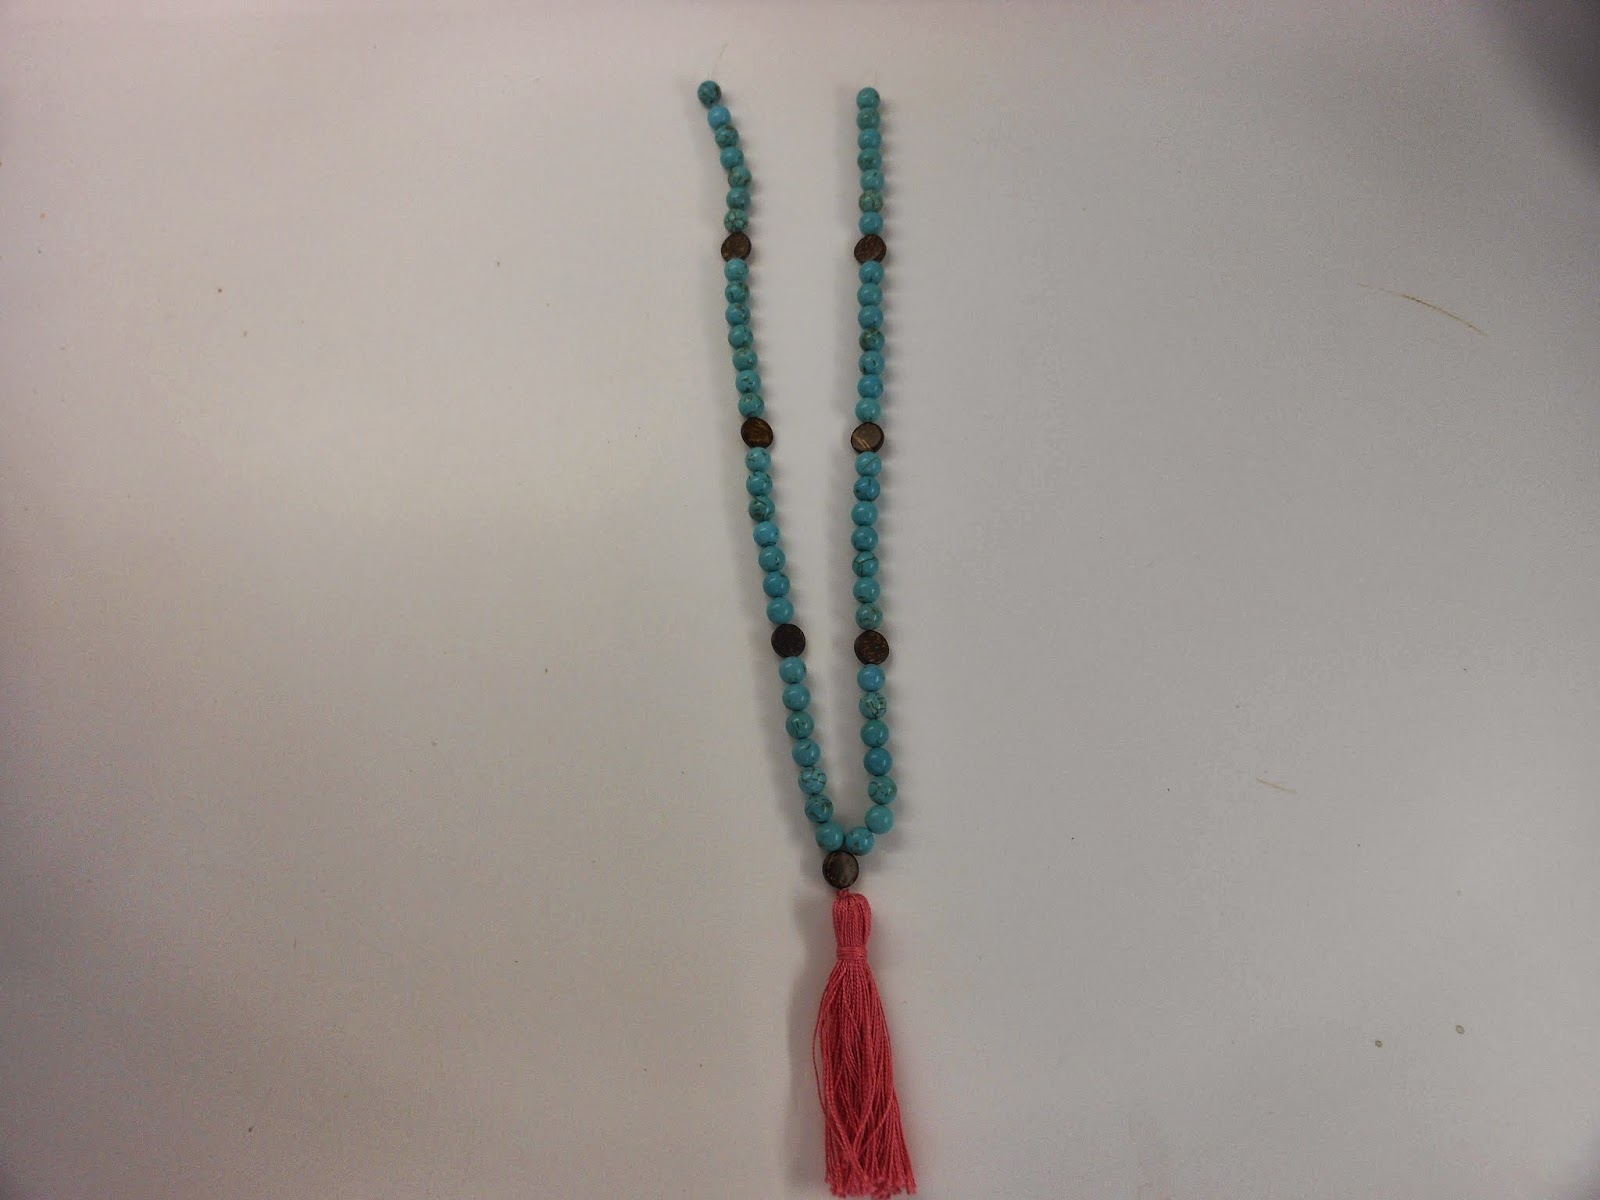
- Your choice of beads, I used two different kinds from Michaels and ended up getting four strands of blue beads, each strand was seven inches. The other strand was used for little accent beads so I only needed one strand for that. Feel free to mix up different kinds of beads or stones, it's your necklace, so make it just the way you want it!
- Bead elastic or fishing line *NOTE: I used stretchy bead elastic at first, but my beads appeared to be too heavy and weighed it down. If you want to use smaller beads stretchy elastic is fine, but if yours are a little larger or heavier I would recommend something that doesn't stretch and isn't elastic, such as thin fishing line.
- Strong glue or super glue
- Scissors
- *OPTIONAL: If you decide you want to make your own tassel the way I did, you can use cotton embroidery thread. However if you have already have a tassel you want to use, that is fine too!
I actually got all my supplies from Michaels, but you can get any of them from your local craft store.
- Also if you are making a tassel you will need a piece of cardboard the size you want your tassel to be. It has to be strong enough to wrap thread around without folding.
First I'll show you how to make the tassel. Obviously if you already have a tassel you want to use, you can skip this part and move on to making the actual necklace. So first what you need is the embroidery thread *I have both colors pictured here but you only need one. You also need cardboard, scissors, and glue.
To make the tassel, start wrapping your embroidery thread around the cardboard.

Continue wrapping thread around the cardboard until it is as thick as you want your tassel to be. Remember you're going to remove the cardboard, and the tassel will be the thickness of both sides combined.
Now remove the cardboard like I mentioned before. Make sure to keep it in the shape of a loop as seen in the next two pictures below.


Now cut another piece of thread. I decided to fold it in half so it was a little thicker. Put the thread through the loop you've previously made as seen below.
Now take the two ends of the thread and tie a double knot above the loop. Then secure with glue. Don't cut the ends just yet, leave them for now.
Now take one more piece of thread and tie a knot around the thread about half an inch from the top.
Then, continue wrapping the piece around the thread and tie it off in the back. This is shown in the two pictures below.


Now cut the remaining ends off and secure with glue, you're almost done with the tassel!
Lastly take your scissors and put them through the bottom of the loop.This may be hard, but cut through the bottom of the loop, making your tassel!
You're now done with the tassel and you can get started on the necklace!
To start making your necklace, take either your bead elastic or thin fishing line and measure out how long you want it. Leave a little bit on the end so you'll be able to tie it. Then, take the thread that is still on the tassel and tie it around the string to attach your tassel. Trim the ends and secure with glue.
Now that the tassel is on your string, grab your beads!
I like to separate my beads into bowls when I have different types, so that is what I've done below.
I wanted use a few accent beads, so I took one bead and put both sides of the string through it. If you can sort of see what I've done below, instead of putting the bead on one string I've put it on both.
Here it is again a bit more zoomed out.
Now all you have to do is start stringing your beads!
Continue stringing your beads on in any pattern you like! I've decided to do 7 blue beads, then one brown bead to break up the blue beads.
Make sure you have the right amount of beads you would like and that it is just how you want before you tie it off.
Now tie the two ends together and secure with glue! You're done!

You've now made your very own tassel necklace! This can be worn as a fun statement necklace, or if done with smaller beads, an accent piece. I hope you all enjoyed this post and let us know if you make your own! 


Kate & Sarah

Sunday, March 2, 2014
DIY Sunshine sipper...

Hello lovelies!!

Where I love it is currently 72 degrees, with blue skies and lots of sunshine. So I decided on this hot day, I was going to sit outside and sip a nice drink. (Non-alcaholic of course). I am itching for spring, summer and all things warm weather. Are you!? (Comment below Sunshine days if you are). So with a good intro written, we can get into the diy drink. Which I like to call the "Sunshine sipper".

*Things You Will Need*

-Your favorite type of fruit juice: I used mango and tangerine.
- A blender
- A mason jar or glass
- 4-6 ice cubes or 1/2 cup of crushed ice
- A tablespoon of water
- A spoon and/or a straw
** if you want your drink more creamy you can add some milk or cream.

STEP ONE:
Put 4-6 ice cubes in a blender with a tablespoon of water.

STEP TWO-
Add your juice(s), you want your juice to NOT cover your ice. So basically, one parts juice to two parts ice.

STEP THREE-
BLEND BABY!!!!!
I just pressed the pulse button on my blender and held it there until it becomes an icy juicy consistency.

STEP FOUR-
Pour your freezie drink into a mason jar, sip outside in the sunshine. And of course, ENJOY!


Sunday, February 16, 2014

Creative and Simple Organization Ideas

Hello everybody! I hope you all had a wonderful Valentines day! So today I decided to try and organize a bit and decided to share my ideas with you!

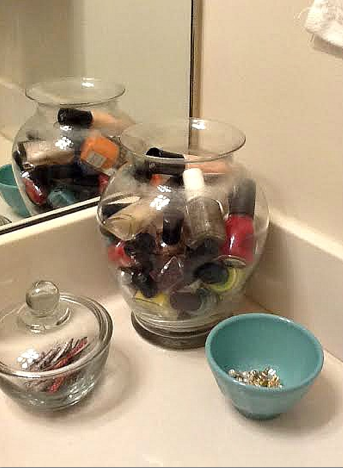
So first I decided to organize my ever growing collection of nail polish. Up until now, I have been keeping it in a large makeup bag, but it was very inconvenient to have to dump out the entire bag to see all the colors. So after some Pinterest searching, I decided to display the nail polish in a large glass vase rather than hide them away. So really all you need to do is arrange your nail polish in a vase and display in your room or bathroom!


I also have a large collection of bobby pins, or hair grips. However it seems as if I am always losing them and buying more! So to attempt to keep them all in one place, I decided to take a small candy bowl (Target) I had and put all my bobby pins in it! Simple as that! This has also helped me keep track of them better!


I tend to wear a few different pairs of earrings and rings more commonly than others so I like to have them on hand. So once again, to keep them all in one place, I used a small blue bowl (Anthropologie) to put them in and keep on my bathroom counter for the morning. This is much easier than having to search for them when getting ready in the morning!


I have a large collection of headbands that consists of everything from beaded to athletic ones. Usually I keep them in a stack in a drawer but I have found it much easier to sort and find the one i want by putting them on a large jump ring such as the one below.


Another easy thing I've discovered helps me stay organized is putting all my lotions and fragrances in the same container. It keeps all the things I need together in the same place, so I always know where they are.


I hope some of these ideas helped you organize a few things! It always saves so much time having everything in the same place right where I need it in the morning and I hope maybe it helped some of you too!  I also hope you enjoyed this post, comment below for more! Contact us with any suggestions for future posts! We love you all!


Kate & Sarah