Pages

Sunday, March 2, 2014

DIY Sunshine sipper...

Hello lovelies!!

Where I love it is currently 72 degrees, with blue skies and lots of sunshine. So I decided on this hot day, I was going to sit outside and sip a nice drink. (Non-alcaholic of course). I am itching for spring, summer and all things warm weather. Are you!? (Comment below Sunshine days if you are). So with a good intro written, we can get into the diy drink. Which I like to call the "Sunshine sipper".

*Things You Will Need*

-Your favorite type of fruit juice: I used mango and tangerine.
- A blender
- A mason jar or glass
- 4-6 ice cubes or 1/2 cup of crushed ice
- A tablespoon of water
- A spoon and/or a straw
** if you want your drink more creamy you can add some milk or cream.

STEP ONE:
Put 4-6 ice cubes in a blender with a tablespoon of water.

STEP TWO-
Add your juice(s), you want your juice to NOT cover your ice. So basically, one parts juice to two parts ice.

STEP THREE-
BLEND BABY!!!!!
I just pressed the pulse button on my blender and held it there until it becomes an icy juicy consistency.

STEP FOUR-
Pour your freezie drink into a mason jar, sip outside in the sunshine. And of course, ENJOY!


Sunday, February 16, 2014

Creative and Simple Organization Ideas

Hello everybody! I hope you all had a wonderful Valentines day! So today I decided to try and organize a bit and decided to share my ideas with you!

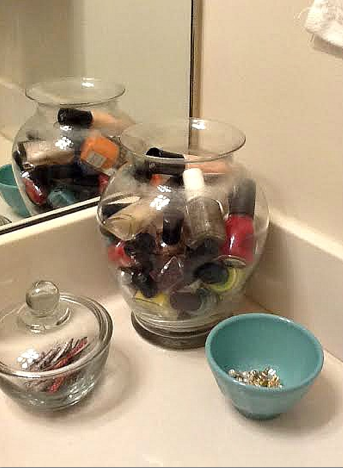
So first I decided to organize my ever growing collection of nail polish. Up until now, I have been keeping it in a large makeup bag, but it was very inconvenient to have to dump out the entire bag to see all the colors. So after some Pinterest searching, I decided to display the nail polish in a large glass vase rather than hide them away. So really all you need to do is arrange your nail polish in a vase and display in your room or bathroom!


I also have a large collection of bobby pins, or hair grips. However it seems as if I am always losing them and buying more! So to attempt to keep them all in one place, I decided to take a small candy bowl (Target) I had and put all my bobby pins in it! Simple as that! This has also helped me keep track of them better!


I tend to wear a few different pairs of earrings and rings more commonly than others so I like to have them on hand. So once again, to keep them all in one place, I used a small blue bowl (Anthropologie) to put them in and keep on my bathroom counter for the morning. This is much easier than having to search for them when getting ready in the morning!


I have a large collection of headbands that consists of everything from beaded to athletic ones. Usually I keep them in a stack in a drawer but I have found it much easier to sort and find the one i want by putting them on a large jump ring such as the one below.


Another easy thing I've discovered helps me stay organized is putting all my lotions and fragrances in the same container. It keeps all the things I need together in the same place, so I always know where they are.


I hope some of these ideas helped you organize a few things! It always saves so much time having everything in the same place right where I need it in the morning and I hope maybe it helped some of you too!  I also hope you enjoyed this post, comment below for more! Contact us with any suggestions for future posts! We love you all!


Kate & Sarah

Wednesday, February 12, 2014

New Blog Series?

Hello my loves!
Today is a special day! Sarah and I are introducing something new to Wishable. A BLOG SERIES!! We are super excited to announce this. The series is called RAVEMOMENTS, yes we know it sounds weird. But all it is is us "raving" about something new each week. Every Friday we will be RAVING about something! Such as, a nail polish we've been loving or a song. (Or food) :). We really hope you all will enjoy it. We're doing this in hopes more people will follow because they have something to look forward each week. Also, if you guys EVER have anything you want us to try, or review about, EMAIL us! We would be happy to hear your suggestions! Sarah and I are also creating a blog post schedule which will be posted soon! Hurray! We love this blog and all of you. We also are making some changes to the name and the look of the blog. So if you notice any changes, we're trying to update a bit. We hope you like it! Thanks so much! Hope you guys will comment or follow!


PS We have also recently joined Bloglovin! You can follow us at www.wishableblog.blogspot.com! Thanks!
<a href="http://www.bloglovin.com/blog/11781911/?claim=xhsx25tst9v">Follow my blog with Bloglovin</a>

With love,
Sarah & Kate

Spring trends

Hello everybody!
Recently I have spent my time reading many fashion magazines. I always do this before a new season , so I can see what new trends are up coming up. This post is all about the newest spring 2014 trends, and makeup looks to re create for less. I hope you enjoy!

LOOK ONE-Pastels:
If you take one glance at a fashion magazine this spring you will see pastels galore. Muted pastels, bright pastels, ALL different types. Today I will show you some pictures off the runway of pastels.


These trends came straight off the runway of fashion week 2014. Many of the newest pastels looks are menswear inspired and have very structured form. We can re create this look with a structured cropped blazer and form fitting pastel pants, or for a more girly look you could go with a pastel dress ,and a structured blazer.

TIPS FOR BUYING SPRING CLOTHES-
Start off by buying a spring staple piece, like a blazer or structured skirt. In of course, a pastel color. I recommended going online, and searching for one. I like the store Gap, because it is a classic store that sells staple pieces for less.
Make sure when you invest in any clothing item that you have something to wear it with,and it looks good with your skin tone and hair.


LOOK TWO- Florals:
I don't know about you but there is something about a floral print that just SCREAMS spring. There are many floral looks out on the runway. One of the easiest looks to re create is a nice floral dress, like the model in this picture.


*MAKEUP LOOKS OF THE RUNWAY*


There are lots of new beauty trends this spring. Such as, orange lips, and aqua eyeliner, to tousled hair and a fresh face.

The first and probably most wearable look to re create is the "fresh faced" look.

Here are some drugstore products and brushes to help achieve that look without breaking the bank.

The first step is to get a natural looking but blemish free face. To do that recommend a bb cream. The best bb cream to do that with is the Olay fresh effects bb cream. Dab that in with a makeup sponge to create a flawless look.
Then take a cream blush and lightly swirl it in with your finger to achieve a healthy flushed glow.
Then taking a highlighter highlight your cheek bones, dab your highlighter in with a makeup sponge.
Next, apply a golden or pinky eyeshadow to your lid, and then highlight your inner corner of your eye.
The last step is to apply a coat of mascara, and the a wipe on a pinkish nude colored lip gloss.

The second look is the orange lipped look.

Apply the same fresh faced makeup but switch out the lip gloss for a bold creamy orange coral lip stick.

The third look is the aqua eyeliner look.
Keeping the same makeup apply an aqua blue eyeliner to your lower lash line.

For your sprig hair. Keep it low key, and tousled.

Tousled waves are very big right now. All you need to do is curl one inch sections of your hair, and then shake them out a little. Apply a root lifting spray and viola, your a new fresh faced spring goddess.


I hope you all enjoyed this post. Send us pictures to our email if you re create any of fashion weeks favorite looks. Lots of love- goodbye!!


Wednesday, January 29, 2014

Snow day Surprises...

Hello!
Depending on where you live you may get 3 feet of snow, but where I live I get about 2 INCHES every other year. So it's a great feeling when my school calls me and says... "School is cancelled". I just start freaking out and jumping on my bed. It is currently snowing where I live, so that means I have to post something wintery. Today's post is all about my snow day essentials and 10 fun things to do on a snow day... Or it can be just a lazy day if it's not snowing where you live. Merry snow day to all! 

10 FUN THINGS TO DO ON A SNOW DAY...

1. Make some hot chocolate-
When it's cold outside I turn on the fire and make my favorite hot chocolate. My current favorite hot chocolate is Starbucks salted Carmel hot chocolate. You can buy this mix in a 10 pack at target. (Comment target fanatic below if you love target too.)   :)

2. Paint your nails-
I love painting my nails, my favorite color right now is Essie bikini so teeny. I love this color it's a periwinkle blue color that is not to bold, and looks perfect on a snow day.

3. Take a bubble bath-
When it's snowing outside I make sure to keep myself warm, taking a nice, long, relaxing, hot bubble bath is the perfect way to do that. I use my Philosophy vanilla bean bubble bath. This stuff smells like warm sugar cookies. I love it.

4. Read-
Curl up under the covers with a nice cup of tea (my favorite tea is sugar cookie sleigh ride tea or nutcracker sweet tea) and one of your favorite books. I don't have a favorite book, but I love to read. Currently I am reading To Kill A Mockingbird

5. Re decorate your room-
You have a whole day to yourself, use this time to add some white twinkle lights to your room or make a fun DIY. You could even re arrange your furniture. Go on Pinterest and get inspired. 

6. Bake-
I love all desserts, some of my favorite things to bake are cookies. Google a recipe and make some cookies. You have all day so you can bake something from scratch. 

7. Take some pictures-
Call up some of your girlfriends, grab a camera, and get out in the snow to take some pics. If you have a Polaroid you could take some really pretty pictures of the snow. I don't know about you but I think snow makes everything look magical.

8. Go sledding-
If you have enough snow go searching in your attic or garage for a sled. Find a great hill and start sledding. It doesn't matter how old you are, nobody cares because sledding is for all ages!

9. Go shopping-
You can't go to school or drive anywhere so use the internet to your advantage. There are some great sales when you online shop. A plus is anything you order is delivered right to your doorstep. When you online shop there's no going out in the cold.

10. Watch some YouTube videos-
I love to watch you tube videos. Just search some of your favorite you tubers and watch all of there videos.
~~~~~~~~~~~~~~~~~~~~~~~~~~~~~~~~~~~~~~~~~~~~~~~~~~~~~~~~~~~~~~~~~~~~~~~~~~~

*SNOW DAY ESSENTIALS* 
I love snow, and having no school. But we all need some things to keep us going when it's cold and snowy outside, so I'll be sharing my top 5 snow day essentials.

*My first essential is water. Water is very important for your body, when you're out and about playing in the snow you can get very dehydrated. I fill up one of my favorite lily pulitzer tumblers with water, and sip away.

*My second essential is some essential is a highlighter and some blush. When it's snowing outside you're going to want to be inside looking like a snow princess. I use a highlighting stick and put it in the inner corners of my eye to make me seem more awake. Then I take a nice rosy colored blush and blend it into my cheeks. This gives me a healthy, flushed complexion.

*My third essential is a blanket. I love cozying up on my bed and reading. But, I have to have a cozy blanket. My favorite one is from pb teen.

*My fourth essential is soup. I love soup on cold days it warms me up from the inside out. My favorite soup is chicken noodle soup with star shaped pasta. 

*My fifth essential is a movie or lots of my favorite tv shows. Pick out your favorite movie and cozy up on the couch as you watch it. If I'm behind on one of my favorite tv shows, I will use a snow day to catch up on it.


I hope you enjoyed some of my snow day favorites! Have fun and keep warm!


Kate & Sarah


Sunday, January 26, 2014

DIY: Card And Matching Frame

Hello everybody! Sorry it's been so long since the last post; we've been busy with other posts to edit,  creating the layout of the blog, and planning some fun things for the future. Whew launching a blog is a lot of work! We've also made a Pinterest account, (Sweet Serendipity if you want to follow us!) which is very addictive I will tell you. So the post for today is a very simple DIY, that can be done by anyone. Lets get started!

Recently I received a Thank You card from one of my good friends, and it was just too pretty to throw away! So I decided that I had to make something out of it, or display it in some way, which is where I came up with the simple idea of putting it in a frame! I can easily say that you can pretty much put almost anything in a frame, which is what I will show you how to do here. This doesn't have to be done with a card, you can switch it out for some pretty paper if you'd like. I based the color of the frame and supplies around the colors of the card but you can substitute the colors to match your card/paper.

Supplies:

Folkart Metallic Acrylic Paint in Gold (from Michaels)
Scissors
A cheap sponge brush (also from Michaels)
A wooden frame (I used the Art Minds one from Michaels again, I do love Michaels ;P )
A pretty card or paper


So first I've gathered my supplies as you can see. All the materials are really simple and can easily be found at your local craft store. You can also see the card I chose to use.


Next I took the gold acrylic paint and the sponge brush and painted on two coats. You can do more or less depending on how you want it to look, but I wanted mine to somewhat match the gold on the card.


While the frame was drying, I took the card and trimmed it so it would fit in the frame. This depends on what frame you're using, but I opted not to use exact measurements and continued to trim on each side until I had it right. Before you start cutting, I recommend figuring out which part of your paper or card
you want in the frame so you don't end up having to cut it off.


Once you put your card or paper in the finished frame, you're done! See, very easy! This is a super simple project that looks great anywhere and can be done by anyone! I put mine on my desk so the blue would go with my lamp as you can see below.


So I hope you enjoyed this very simple DIY! Let us know what you think and if you want more!
Thanks so much, we love you!


Kate & Sarah

Friday, December 20, 2013

Winter essentials!

During Winter I get dry skin, chapped lips, and brittle, stringy hair.  
But I fix my problems with my Winter essentials... There are quite a few. Some hair, some makeup, and some food. So here's a couple of my winter must haves to be mistletoe ready! 

MAKEUP~ 
I love my Maybelline volume express mascara. I am always picture worthy when I have this mascara on. It lengthens and defines my lashes without making them look un-natural. 
My next product that really helps during the winter is my E.L.F eyeshadow. The eyeshadow colors that I LOVE is the white one and grayish tinted one. These eyeshadows are inexpensive and they make your eyes look like a winter wonderland! 

SKINCARE~
My favorite skincare items are very inexpensive from the drugstore. One of my favorite moisturizers is very lightweight and oil-free. It is the clean and clear morning burst moisturizer. Another skin product that I like is the formula 10.0.6 hydrating foaming gel cleanser. It smells amazing, it smells like yummy fruits. 

LIPPIE PRODUCTS- 
These are my favorite during winter. I lOVE all lip products!! But, I hand picked a couple that are great during winter! I love all of my EOS, but my favorite one is the sweet mint one or the blueberry acai. Another lip product that I love during winter are the maybelline color whispers, in the colors pin up peach and one size fits pearl. These two colors are beautiful. The pin up peach is actually a berry pinky peach that is gorgeous. The color one size fits pearl is a pearly pinky nude that is great on its on or perfect overtop your favorite staple lipstick. 

HAIR PRODUCTS-
My hair is like a roller coaster ride during the winter. One day it looks great then the next day it is a bit wa wa wahhh. For those types of days, and just everyday I have some hair products that aid me throughout the winter. The first hair product I love is the It's a 10 miracle leave in conditioner. This product is my holy grail hair product it is ten hair products rolled into one. It truly is a miracle worker for my hair. It reduces frizz, protects your hair from heat, and makes silky, shiny, and soft. Another hair product that I like to use when my hair is felling dry, is the Aussie three minute miracle. When my hair is in need of moisture I give it this product. This deep conditioner smells like a paradise island, and leaves your looking and feeling soft and silky without weighing it down like some leave in conditioners. One product I use after towel drying my hair is the Not Your Mothers beach babe spray, this product gives me beautiful beachy waves without heat. To use this product I put my damp hair in a braid and then sprits this all over it. Then I sleep. In the morning I take out my braid, and spritz more of the product on to my hair.

FOOD~
I love swissmiss hot chocolate packets in the winter time they are easy to use and supper yummy. I mix mine with milk and top it with whipped cream. Then for an extra pretty starbucks presentation I use a bit of red and green christmas sprinkles to top it off.